No edit summary |
No edit summary Tag: Visual edit |
||
| Line 46: | Line 46: | ||
[[File:SoloConfig.png|alt=|center]] |
[[File:SoloConfig.png|alt=|center]] |
||
| ⚫ | |||
| − | |||
=='''Host Tab'''== |
=='''Host Tab'''== |
||
| Line 81: | Line 79: | ||
You will notice a Database tab as well. This tab will allow you to backup your solo match. You can use it to save and restore old server states or delete your current state. This functions exactly the same as the Solo setting does. |
You will notice a Database tab as well. This tab will allow you to backup your solo match. You can use it to save and restore old server states or delete your current state. This functions exactly the same as the Solo setting does. |
||
| + | |||
| ⚫ | |||
| + | The in game server host tab gives you a lot of options to get started with. If you feel you'd like to venture a little further there are a few more adjustments that can be made in the serverconfig.txt. You will be able to better tailor your experience if you'd like although we do suggest you check out some presets first to get a good feel for things. |
||
| + | |||
| + | There's quite a bit more to go over and we will do so on the [[Hosting|WIKI]]. We'll expand this page as we work through alpha. Feel free to add to the wiki as you see fit it's mostly community driven. |
||
| + | |||
| + | |||
| + | '''<u>Consumables.json</u>''' |
||
| + | |||
| + | |||
| + | '''<u>Craftables.json</u>''' |
||
| + | |||
| + | |||
| + | '''<u>ServerConfigSolo.txt</u>''' |
||
| + | |||
| + | |||
| + | '''<u>ServerConfigTEMPLATE.txt</u>''' |
||
| + | |||
| + | |||
| + | '''<u>ServerUsers_README.txt</u>''' |
||
| + | |||
| + | The ServerUsers.txt file stores all the players that have ever been on a server. Altering this file directly should not generally be required. |
||
| + | |||
| + | The main reason to edit this file would be to increase a players user group. The number directly after the long Steam ID. When in game players can promote other player to any rank that is lower than their own. To set a rank in-game. |
||
| + | |||
| + | * /setrank userName indexOfRank |
||
| + | |||
| + | Or |
||
| + | |||
| + | * /setrank userName rankName |
||
| + | |||
| + | Example user: 76561198004636696,3,false,false,Jayty |
||
| + | |||
| + | |||
| + | '''<u>ServerUsers.txt</u>''' |
||
| + | |||
| + | As the ReadMe indicates the serveruser file contains a list of all players who have entered your server. |
||
| + | |||
| + | [CODE/] |
||
| + | |||
| + | 76561198038502026,2,false,false,JB |
||
| + | |||
| + | 76561198004636696,3,false,false,Jayty |
||
| + | |||
| + | [/CODE] |
||
| + | |||
| + | |||
| + | '''<u>TpPresets_README.txt</u>''' |
||
| + | |||
| + | The TpPresets.json holds a series of teleportation locations. To edit, add or remove these presets the following commands can be used in game. |
||
| + | |||
| + | * /tppreset add nameOfPreset //This adds a tp location a the place where your player is currently located. |
||
| + | * /tppreset update nameOfPreset //This will edit an existing preset to the location the player is currently located. |
||
| + | * /tppreset remove nameOfPreset //Deletes preset of name. |
||
| + | * /tppreset clear //Clears all tp presets. |
||
| + | * To use preset locations enter the commands. |
||
| + | * /tp me nameOfPreset //Tp's yourself to location. |
||
| + | * /tp userName nameOfPreset //Tp's another player to location. |
||
| + | |||
| + | NOTE: Requires teleportation permissions to edit/use. |
||
| + | |||
| + | |||
| + | '''<u>TpPresets.json</u>''' |
||
| + | |||
| + | |||
| + | '''<u>UserPermissions_README.txt</u>''' |
||
| + | |||
| + | The UserPermissions.json file contains the base set of user groups and permissions. The UserPermissions.json can be changed while the server is offline in order to setup ranks and their perms. |
||
| + | |||
| + | By default base user groups such as 'User' (All general users) right through to 'Owner' status is setup. Any user group that has the permission '*' has access to ALL in game commands and this should be used sparingly. |
||
| + | |||
| + | Editing: The most important thing when editing is to ensure that the json architecture is maintained. Otherwise the server will fail to read the file and not run. |
||
| + | |||
| + | List of all perms. Note that some may not work as expect or work at all. |
||
| + | |||
| + | * BasicUser, |
||
| + | * DropAllSelf, |
||
| + | * DropAllOthers, |
||
| + | * DeleteAllSelf, |
||
| + | * DeleteAllOthers, |
||
| + | * SpawnAI, |
||
| + | * KillAI, |
||
| + | * SetTime, |
||
| + | * SetMonth, |
||
| + | * SetWeather, |
||
| + | * WeatherOnOff, |
||
| + | * TpToLocation, |
||
| + | * TpToPlayer, |
||
| + | * TpPlayerToMe, |
||
| + | * TpPlayerToPlayer, |
||
| + | * TpPresets, |
||
| + | * GodSelf, |
||
| + | * SuperSprint, |
||
| + | * ServerInfo, |
||
| + | * Give, |
||
| + | * Mute, |
||
| + | * Kick, |
||
| + | * Ban, |
||
| + | * UnBan, |
||
| + | * SetStatsSelf, |
||
| + | * SetStatsOthers, |
||
| + | * KillPlayer, |
||
| + | * SetRank, |
||
| + | * CleanUp, |
||
| + | * Up, |
||
| + | * AlwaysSafeLogOff, |
||
| + | * StuckOthers, |
||
| + | * ChatOff, |
||
| + | * Video, |
||
| + | * Restart |
||
| + | |||
| + | |||
| + | '''<u>UserPermissions.json</u>''' |
||
| + | |||
| + | |||
__NOTOC__ |
__NOTOC__ |
||
Revision as of 23:55, 8 March 2021
Survive the Nights is and always will be a multiplayer game. It's what we set out to make and it's what we're still making. We always saw this game as a co-op friend fueled experience, the more the merrier. That being said, a lot of players don't seem very interested in playing with others. One feature (if not the most requested one) is single player and while time and design doesn't really allow for a true single player, we've done our best to replicate this experience.
To get right down to it Survive the Nights requires a server and currently there's no way around that. This doesn't mean we can't replicate a single player experience though. In the 1.7 build you will find a "Solo" tab. Opening this will display all solo options and allow you to start what is essentially a solo server using your local host. You will be able to adjust basic settings and play by yourself without the worry of other players possibly ruining your good time. The solo process works by creating a locally hosted server doing so should require no extra input from the player. This should work for the majority of people. All you need to do is simply click the solo tab, select your setting and click the play button. The game will take care of the rest.
This process will not be cheap. You will need a decent amount of ram to run a solo server smoothly. We will be working on optimizations across the board in the coming updates.
Solo Tab
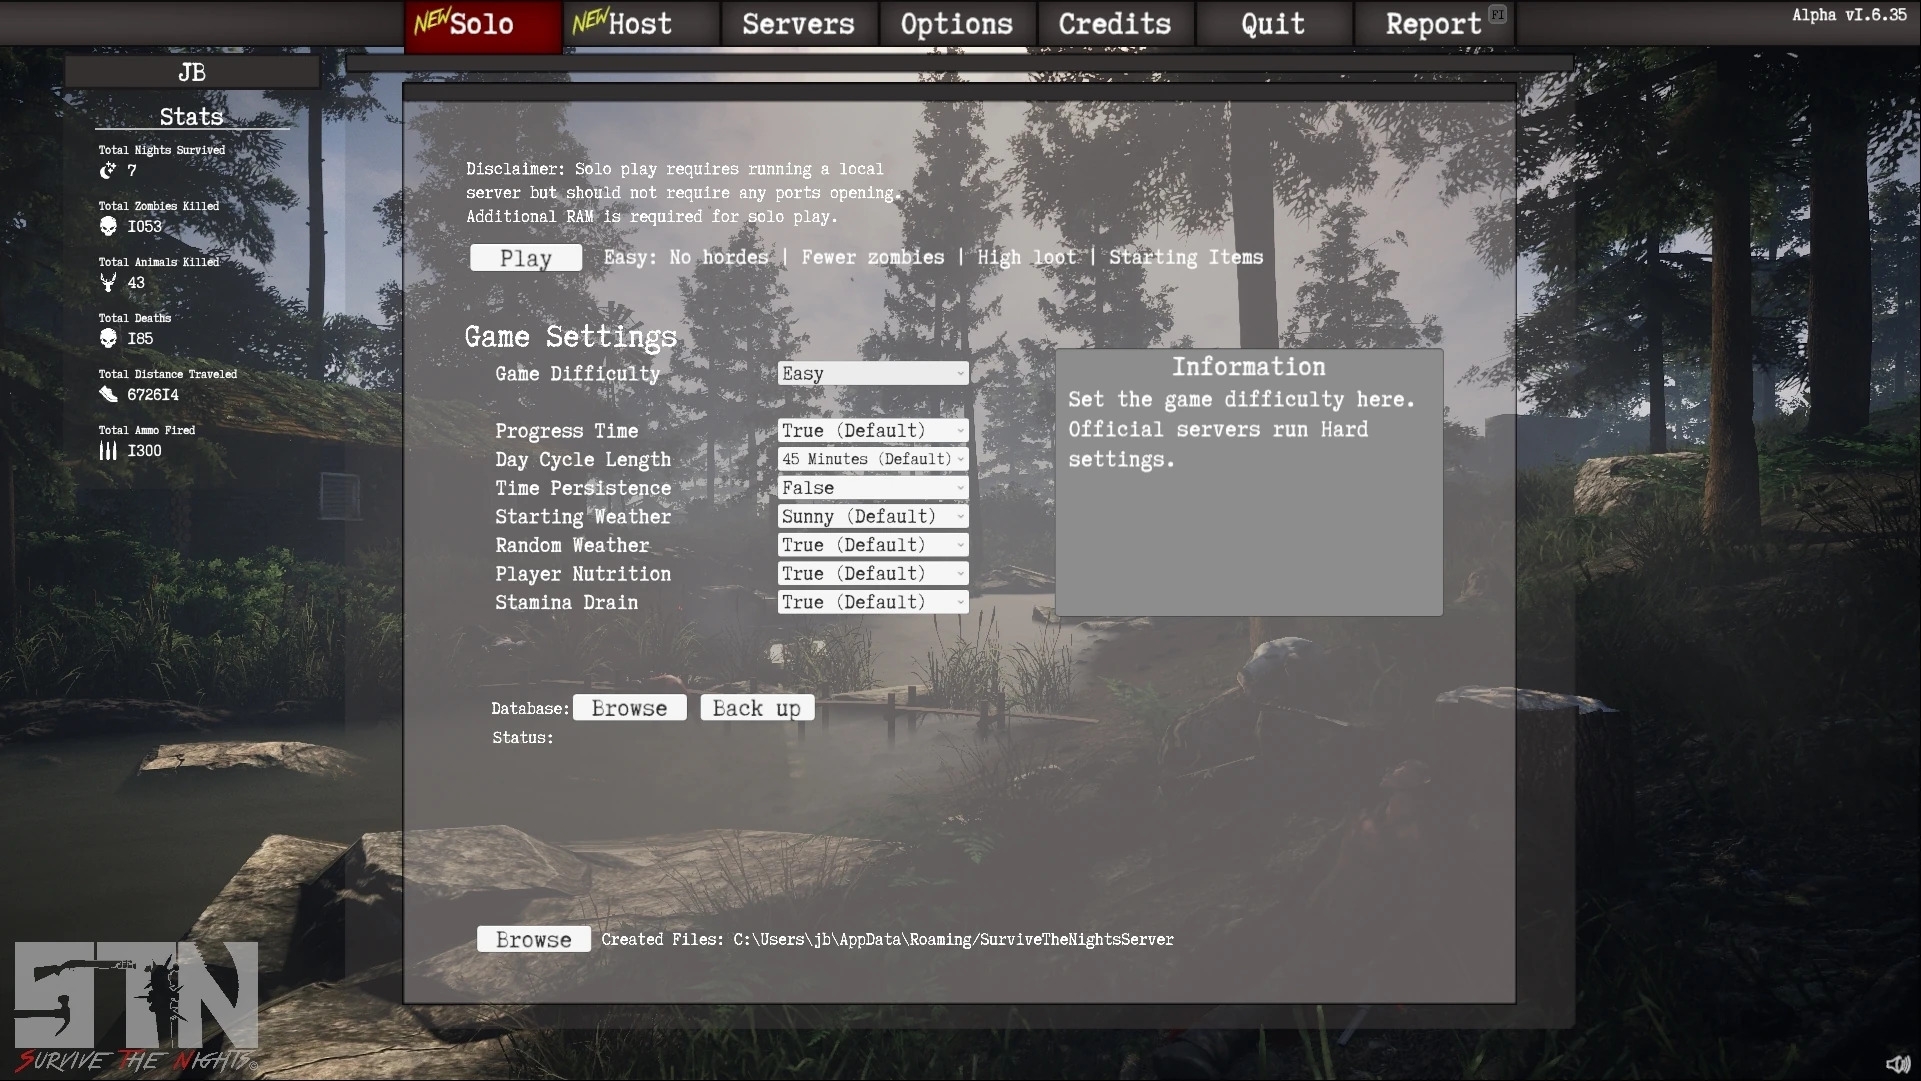
Solo Tab Settings
- Disclaimer: Solo play requires running a local server but should not require any ports opening. Additional RAM is required for solo play.
- Game Difficulty - Easy, Medium, Hard (Default), Hardcore.
- Easy - No hordes | Fewer zombies | High loot | Starting items
- Medium - Easier hordes | Fewer zombies | Starting items
- Hard - Matches Official Servers (Default)
- Hardcore - Harder Hordes | More zombies | Start with nothing (This is the one you want)
- Time Persistence - When true time progresses based on the 'Day Cycle Length' option. False results in time staying the same as launch time or the '/time' the server admin sets the server to.
- Day Cycle Length - The in game time cycle length based on minutes 15m, 30m, 45m (Default), 1h, 1h 30m, 2h, 3h, 4h, 5h and lastly 24h (for the maniacs).
- Starting Weather - The weather when the server is started. Sunny (Default), Light Rain, Heavy Rain, Storm, Light Snow, Heavy Snow, Snow Storm.
- Random Weather - Should server have random weather events. If false then server remains in starting weather state.
- Player Nutrition - Do players need to consume food and drinks?
- Stamina Drain - Should the player have stamina drain and how fast should it drain?.
You will notice a Database tab as well. This tab will allow you to backup your solo match. You can use it to save and restore old server states or delete your current state.
Browse - This will open the directory location of your database save file and backups that you have taken. Backup - Quickly backs up the server database.
The browse button will allow you to access the current server database .stn-server this is the file that controls your current servers state. It stores all the relevant information when it comes to the server 'world'. As an example, if the player were to spawn into a solo match, place a plank on a window then quit and delete .stn-server, the plank would no longer be there on the next join. Everything has a save state and it's all controlled by .stn-server.
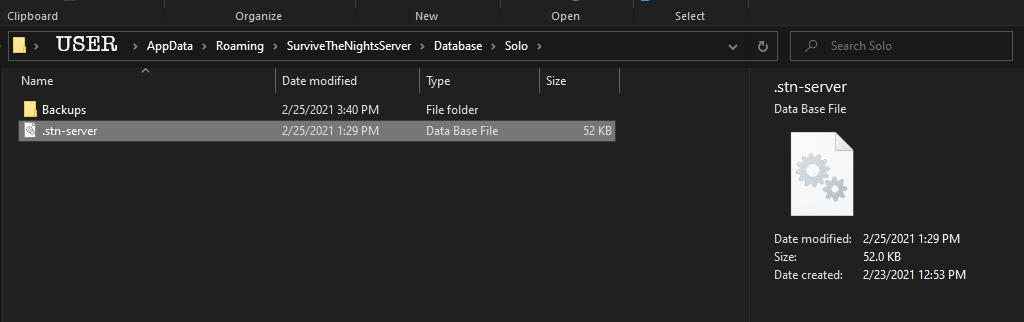
The window that opens upon clicking the "Browse" button
Backups
After the browse button opens Solo directory, it will allow you to access the "Backups" folder. This folder will contain all of the backups generated by pressing the "Backup" button in game. These backups will be all be sorted and dated allowing you to easily store and restore older server saves.
Server backups will be dated for convenience
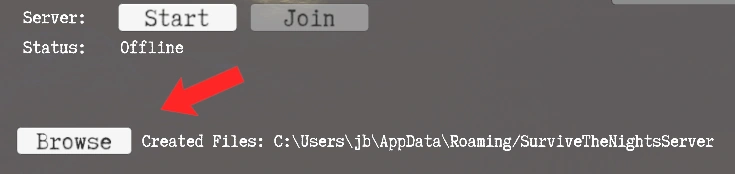
Browse
Below the database buttons you'll find a little out of the way button titled 'Browse'. This will allow you direct access to many of the servers configuration files. For the most part and for most players the above options will be enough. The team strongly suggest you do not alter any of the configuration options at first. Use the basic settings above and have a few good play throughs. These config files will allow you to adjust all of the server options (same as a hosted server) including settings like teleport pre-sets and user permissions. Most of these files are .json based and simple to understand. As always, feel free to reach out on Discord if you have any questions.
Host Tab
Host tab settings
In game server hosting is a nice simple solution for those that want to play online with friends. The host option will allow a player to start a public or privately hosted server. It can be placed on our public server list for all to see or you can simply share your IP with a friend and allow them to join discreetly. This option does require quite a bit more knowhow than the solo option. Ports need to be opened and forwarded to allow for outside connections. This is not recommended for players new to networking and multiplayer games. This host option is more of a co-op experience. The server is only running when you're playing so friends wont be able to join without you. This option isn't our dedicated server option. You will see that shortly as we have a bit more to work on. The dedicated servers will run linux and be available via a Steam depot.
- Progress Time - This option is the same as the solo setting. When true time progresses based on the ‘Day Length’ option. False results in time staying the same as launch time or the ’/time’ the server admin sets the server to.
- Day Cycle Length - The in game time cycle length based on minutes 15m, 30m, 45m (Default), 1h, 1h 30m, 2h, 3h, 4h, 5h and lastly 24h.
- Time Persistence - When true time progresses based on the 'Day Cycle Length' option. False results in time staying the same as launch time or the '/time' the server admin sets the server too.
- Starting Weather - The weather when the server is started. Sunny (Default), Light Rain, Heavy Rain, Storm, Light Snow, Heavy Snow, Snow Storm.
- Random Weather - Should server have random weather events. If false then server remains in starting weather state.
- Name Tag Distance - The distance that name tags are visible from. No name tags, Near, Medium (Default), Far.
- Announce Logins - Should players be notified when other players join the server? (True | False) e.g. “JB has joined the server”
- Announce Deaths - Should other players be notified when another player dies. (True | False) e.g. “JB has been killed by a Zombie”
- Player Nutrition - Do players need to consume food and drinks?
- Stamina Drain - Should the player have stamina drain and how fast should it drain?.
- Loot Spawn - The rate at which loot spawns. Also controls the quantity of loot. 0 (No loot) - 9 (Overload).
- Hordes - The horde difficulty in game. Can be used to turn hordes off completely.
- Zombie Amount - The amount of zombies on the server. Off, Low, Medium (Default), High.
- Vehicles Amount - The amount and spawn frequency of vehicles on the server. Off, Low, Medium (Default), High.
- Starting Components - The amount of items machines like fires and generators spawn with. None,Low, Medium (Default), High. e.g. A campfire should have firewood and tinder already in it when server starts.
- PvP Disabled - If true players cannot hurt each other.
- Player Starting Items - The item ID numbers to items you want the player to start with. Item ID numbers must be separated with a. comma. The last ID doesn’t need a comma e.g. 1000, 525, 3004 > You can find an Item ID list HERE.
- Server Name - The server name as displayed in the server list.
- Server Password - The server password.
- First Join Message - The message that players receive when they first join your server.
- Return Join Message - The message players receive when they return to your server.
- IP Address - The IP of your server. This should be set to the public IP address of your current network.
- Connection Port - The port that other players should use to connect to your server. Note that this port needs opening and forwarding via your router.
- Show in Public Servers - When true your server will show in the public list of servers. When false players must join using the direct connect text field and your servers IP and Port.
- Steam Query Port - The port that Steam uses to query your server. Used for showing in the public server list. Only required if 'Show in Public Servers' is set to true. Note: Should not be the same as connection port.
You will notice a Database tab as well. This tab will allow you to backup your solo match. You can use it to save and restore old server states or delete your current state. This functions exactly the same as the Solo setting does.
Server Configuration Files and More
The in game server host tab gives you a lot of options to get started with. If you feel you'd like to venture a little further there are a few more adjustments that can be made in the serverconfig.txt. You will be able to better tailor your experience if you'd like although we do suggest you check out some presets first to get a good feel for things.
There's quite a bit more to go over and we will do so on the WIKI. We'll expand this page as we work through alpha. Feel free to add to the wiki as you see fit it's mostly community driven.
Consumables.json
Craftables.json
ServerConfigSolo.txt
ServerConfigTEMPLATE.txt
ServerUsers_README.txt
The ServerUsers.txt file stores all the players that have ever been on a server. Altering this file directly should not generally be required.
The main reason to edit this file would be to increase a players user group. The number directly after the long Steam ID. When in game players can promote other player to any rank that is lower than their own. To set a rank in-game.
- /setrank userName indexOfRank
Or
- /setrank userName rankName
Example user: 76561198004636696,3,false,false,Jayty
ServerUsers.txt
As the ReadMe indicates the serveruser file contains a list of all players who have entered your server.
[CODE/]
76561198038502026,2,false,false,JB
76561198004636696,3,false,false,Jayty
[/CODE]
TpPresets_README.txt
The TpPresets.json holds a series of teleportation locations. To edit, add or remove these presets the following commands can be used in game.
- /tppreset add nameOfPreset //This adds a tp location a the place where your player is currently located.
- /tppreset update nameOfPreset //This will edit an existing preset to the location the player is currently located.
- /tppreset remove nameOfPreset //Deletes preset of name.
- /tppreset clear //Clears all tp presets.
- To use preset locations enter the commands.
- /tp me nameOfPreset //Tp's yourself to location.
- /tp userName nameOfPreset //Tp's another player to location.
NOTE: Requires teleportation permissions to edit/use.
TpPresets.json
UserPermissions_README.txt
The UserPermissions.json file contains the base set of user groups and permissions. The UserPermissions.json can be changed while the server is offline in order to setup ranks and their perms.
By default base user groups such as 'User' (All general users) right through to 'Owner' status is setup. Any user group that has the permission '*' has access to ALL in game commands and this should be used sparingly.
Editing: The most important thing when editing is to ensure that the json architecture is maintained. Otherwise the server will fail to read the file and not run.
List of all perms. Note that some may not work as expect or work at all.
- BasicUser,
- DropAllSelf,
- DropAllOthers,
- DeleteAllSelf,
- DeleteAllOthers,
- SpawnAI,
- KillAI,
- SetTime,
- SetMonth,
- SetWeather,
- WeatherOnOff,
- TpToLocation,
- TpToPlayer,
- TpPlayerToMe,
- TpPlayerToPlayer,
- TpPresets,
- GodSelf,
- SuperSprint,
- ServerInfo,
- Give,
- Mute,
- Kick,
- Ban,
- UnBan,
- SetStatsSelf,
- SetStatsOthers,
- KillPlayer,
- SetRank,
- CleanUp,
- Up,
- AlwaysSafeLogOff,
- StuckOthers,
- ChatOff,
- Video,
- Restart
UserPermissions.json