Steam Relays
Improved Hosting (Steam Relays | No more port forwarding!) START HERE!
We’ve taken our network solution and overhauled it to be able to work with Steams Relay network. This means that the network traffic is now routed through steam. In simple terms, steam has net traffic through to your computer. Utilizing this means that you (the player) doesn’t have to worry about configuring your router to use UPNP or manually port forwarding for the game server.
On a low level, the only change is that the bytes of data are sent through steam instead of a direct connection. Meaning you just sit back and hit ‘host’, invite your friends and we’ll do the rest.
1 - Launch the game and click the host tab. The host tab contains all the basic server setup you should need to start playing with friends.

2 - Create and name your new world

3 - Setup the server as you would like it
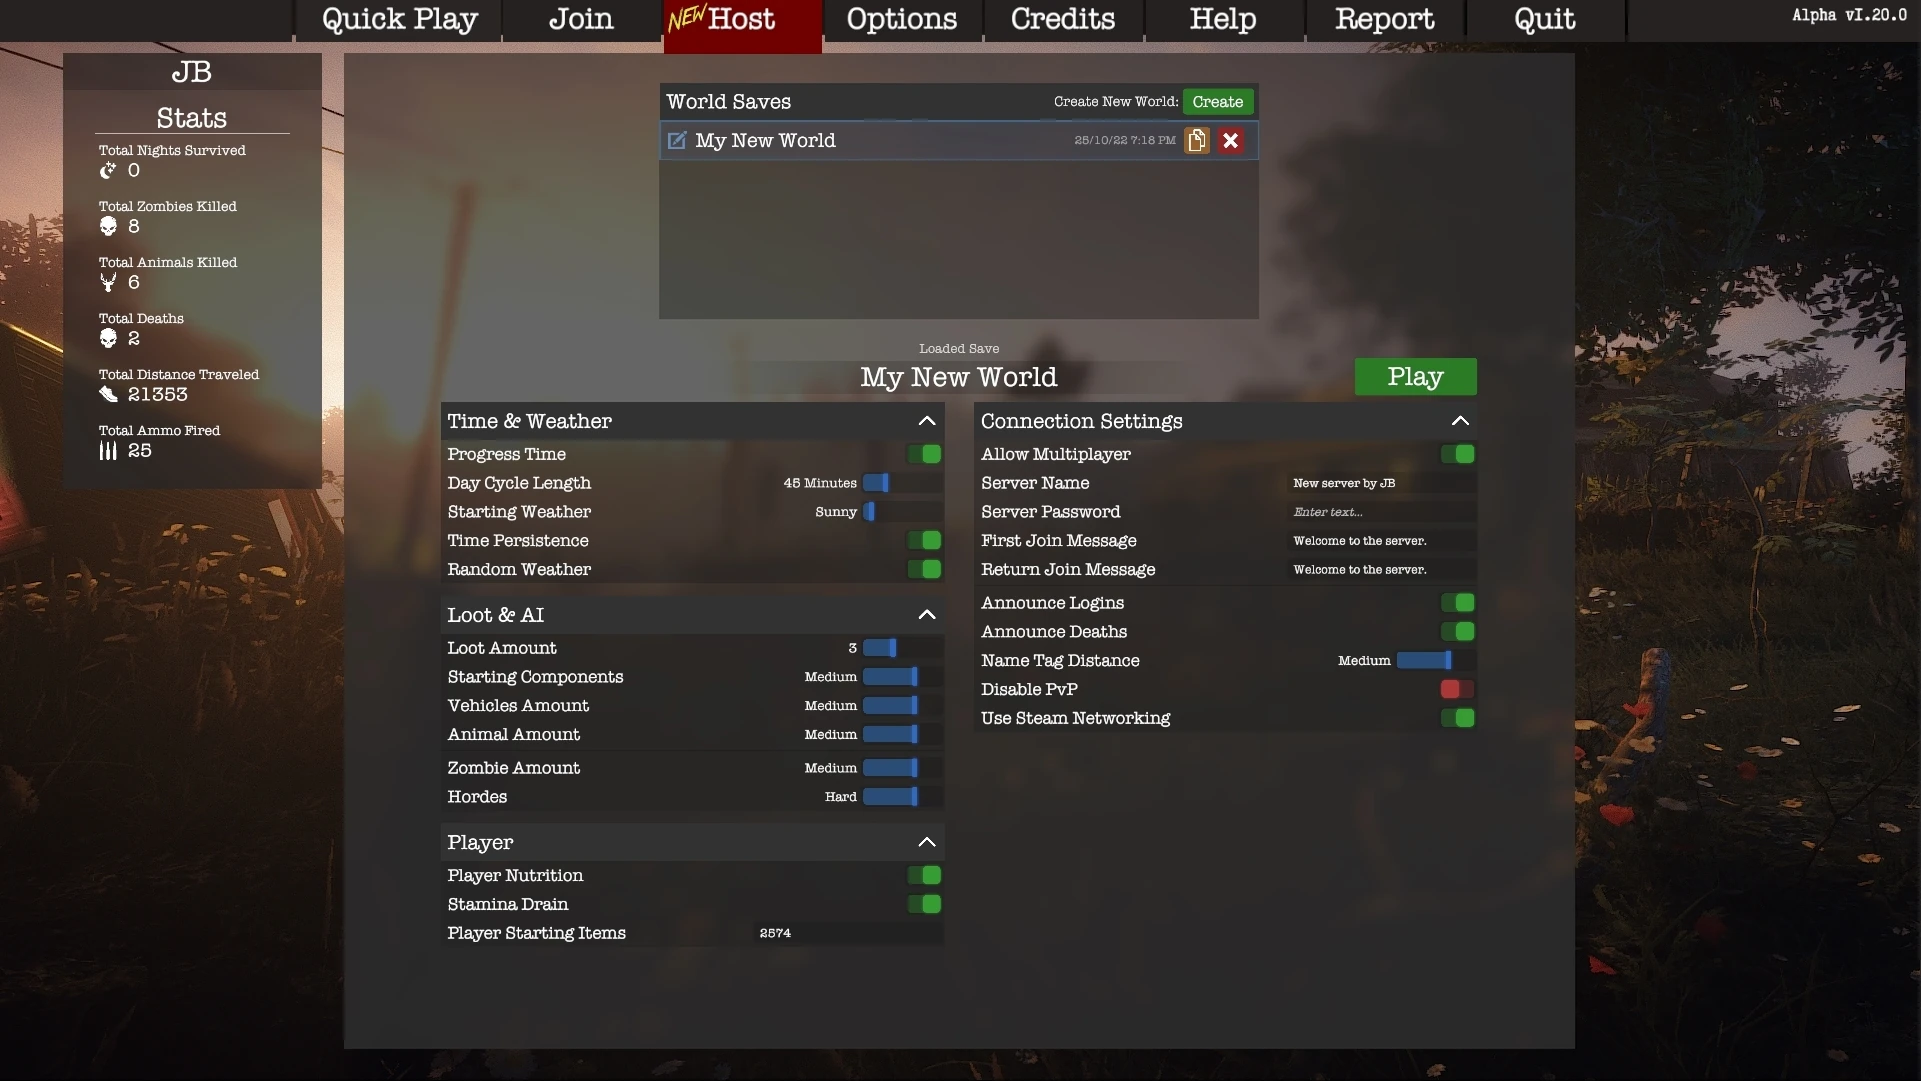
4 - Ensure "Use Steam Networking" is enabled along with "Allow Multiplayer". Click play and you will automatically join your new server. At this point all you have to do is have your friends join you or invite them via the Steam overlay.
5 - Press shit-tab to bring up the Steam overlay. Open your friends list, right click a buddy and invite them to play.

Setting up a Server and Opening Ports (Advanced Settings)
Hosting a Survive the Nights server does take a bit of setup. You need to open at least one port on your router. This process is the same with nearly all providers for the most part. You'll also want to be sure Survive the Nights is allowed through your firewall and port connections are allowed. As an example opening port 8888 and 8889 to allow connection and listing in public server list.
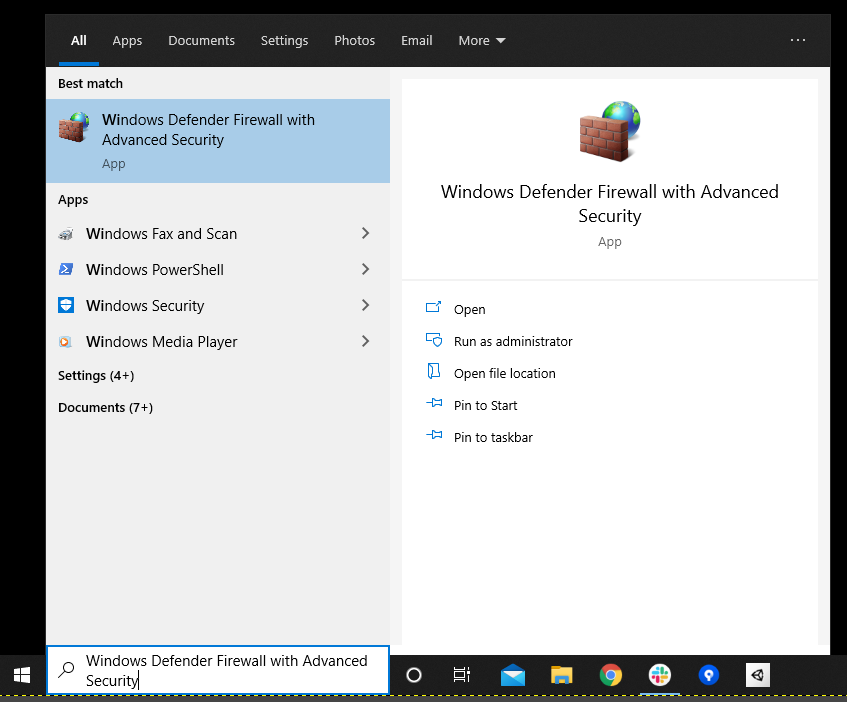
1 - Check to ensure that your firewall is allowing Survive the Nights and connections. In the windows search bar type :
Windows Defender Firewall with Advanced Security
Once you're there ensure Survive The Nights is allowed.

Opening and forwarding ports, you'll need to do this to allow connections to your PC. If you're looking to just host locally we suggest using solo play or running a local server using ip: 127.0.0.1.
Port forwarding seems like a big task but shouldn't be that difficult. That being said all routers are different and you'll need to connect to yours to allow traffic through ports.
Router List - Port Checker has a great router list with step by step directions for most.
Host tab settings
In game server hosting is a nice simple solution for those that want to play online with friends. The host option will allow a player to start a public or privately hosted server. It can be placed on our public server list for all to see or you can simply share your IP with a friend and allow them to join discreetly. This option does require quite a bit more knowhow than the solo option. Ports need to be opened and forwarded to allow for outside connections. This is not recommended for players new to networking and multiplayer games. This host option is more of a co-op experience. The server is only running when you're playing so friends wont be able to join without you. This option isn't our dedicated server option. You will see that shortly as we have a bit more to work on. The dedicated servers will run linux and be available via a Steam depot.
- Progress Time - This option is the same as the solo setting. When true time progresses based on the ‘Day Length’ option. False results in time staying the same as launch time or the ’/time’ the server admin sets the server to.
- Day Cycle Length - The in game time cycle length based on minutes 15m, 30m, 45m (Default), 1h, 1h 30m, 2h, 3h, 4h, 5h and lastly 24h.
- Time Persistence - When true time progresses based on the 'Day Cycle Length' option. False results in time staying the same as launch time or the '/time' the server admin sets the server too.
- Starting Weather - The weather when the server is started. Sunny (Default), Light Rain, Heavy Rain, Storm, Light Snow, Heavy Snow, Snow Storm.
- Random Weather - Should server have random weather events. If false then server remains in starting weather state.
- Name Tag Distance - The distance that name tags are visible from. No name tags, Near, Medium (Default), Far.
- Announce Logins - Should players be notified when other players join the server? (True | False) e.g. “JB has joined the server”
- Announce Deaths - Should other players be notified when another player dies. (True | False) e.g. “JB has been killed by a Zombie”
- Player Nutrition - Do players need to consume food and drinks?
- Stamina Drain - Should the player have stamina drain and how fast should it drain?.
- Loot Spawn - The rate at which loot spawns. Also controls the quantity of loot. 0 (No loot) - 9 (Overload).
- Hordes - The horde difficulty in game. Can be used to turn hordes off completely.
- Zombie Amount - The amount of zombies on the server. Off, Low, Medium (Default), High.
- Vehicles Amount - The amount and spawn frequency of vehicles on the server. Off, Low, Medium (Default), High.
- Starting Components - The amount of items machines like fires and generators spawn with. None,Low, Medium (Default), High. e.g. A campfire should have firewood and tinder already in it when server starts.
- PvP Disabled - If true players cannot hurt each other.
- Player Starting Items - The item ID numbers to items you want the player to start with. Item ID numbers must be separated with a. comma. The last ID doesn’t need a comma e.g. 1000, 525, 3004 > You can find an Item ID list HERE.
- Server Name - The server name as displayed in the server list.
- Server Password - The server password.
- First Join Message - The message that players receive when they first join your server.
- Return Join Message - The message players receive when they return to your server.
- IP Address - The IP of your server. This should be set to the public IP address of your current network.
- Connection Port - The port that other players should use to connect to your server. Note that this port needs opening and forwarding via your router.
- Show in Public Servers - When true your server will show in the public list of servers. When false players must join using the direct connect text field and your servers IP and Port.
- Steam Query Port - The port that Steam uses to query your server. Used for showing in the public server list. Only required if 'Show in Public Servers' is set to true. Note: Should not be the same as connection port.
You will notice a Database tab as well. This tab will allow you to backup your solo match. You can use it to save and restore old server states or delete your current state. This functions exactly the same as the Solo setting does.
Server Configuration Files and More
The in game server host tab gives you a lot of options to get started with. If you feel you'd like to venture a little further there are a few more adjustments that can be made in the serverconfig.txt. You will be able to better tailor your experience if you'd like although we do suggest you check out some presets first to get a good feel for things. There are quite a few additional files that can be edited as well.
Craftables.json
An example of a craftable json file.
{
    "allCraftables": [
        {
            "craftableName": "Air Horn Tripwire",
            "produces": [
                "4023:0"
            ],
            "consumedItems": [
                {
                    "itemName": "Firewood",
                    "item": "2527:0",
                    "resourcesOverride": 0
                },
                {
                    "itemName": "Wire Spool",
                    "item": "2526:0",
                    "resourcesOverride": 0
                }
            ],
            "requiredTools": [],
            "showFirstToolNameInCraftableName": false,
            "showFirstConsumedNameInCraftableName": false,
            "customStringInBrackets": "",
            "workBenchType": 0,
            "timeToCraft": 3.0,
            "keepsFirstConsumablesQuality": false,
            "keepsFirstConsumablesResources": false,
            "craftableIsEnabledIngame": true
        }
    ]
}
Consumables.json
An example of a consumables json file.
{
    "allConsumableJSON": [
        {
            "consumableName": "Drop_Apple",
            "pickupItem": "791:0",
            "consumableType": 0,
            "thisConsumablePortion": 0,
            "cals": 0,
            "hydration": 0,
            "health": 0,
            "stamina": 0,
            "sicknessChance": 0,
            "passiveTaskTokens": 0,
            "requiredToConsume": [],
            "givesBack": ""
        },
        {
            "consumableName": "Drop_Banana",
            "pickupItem": "792:0",
            "consumableType": 0,
            "thisConsumablePortion": 0,
            "cals": 0,
            "hydration": 0,
            "health": 0,
            "stamina": 0,
            "sicknessChance": 0,
            "passiveTaskTokens": 0,
            "requiredToConsume": [],
            "givesBack": ""
        },
        {
            "consumableName": "Drop_Berry_Large_Green",
            "pickupItem": "518:0",
            "consumableType": 0,
            "thisConsumablePortion": 0,
            "cals": 25,
            "hydration": 15,
            "health": 0,
            "stamina": 25,
            "sicknessChance": 1,
            "passiveTaskTokens": 0,
            "requiredToConsume": [],
            "givesBack": ""
        }
    ]
}
ServerConfigTEMPLATE.txt
//   _____                  _             _______ _            _   _ _       _     _
//  / ____|                (_)           |__   __| |          | \ | (_)     | |   | |
// | (___  _   _ _ ____   _____   _____     | |  | |__   ___  |  \| |_  __ _| |__ | |_ ___
//  \___ \| | | | '__\ \ / / \ \ / / _ \    | |  | '_ \ / _ \ | . ` | |/ _` | '_ \| __/ __|
//  ____) | |_| | |   \ V /| |\ V /  __/    | |  | | | |  __/ | |\  | | (_| | | | | |_\__ \
// |_____/ \__,_|_|    \_/ |_| \_/ \___|    |_|  |_| |_|\___| |_| \_|_|\__, |_| |_|\__|___/
//  / ____|                                           / _(_)            __/ |
// | (___   ___ _ ____   _____ _ __    ___ ___  _ __ | |_ _  __ _      |___/
//  \___ \ / _ \ '__\ \ / / _ \ '__|  / __/ _ \| '_ \|  _| |/ _` |
//  ____) |  __/ |   \ V /  __/ |    | (_| (_) | | | | | | | (_| |
// |_____/ \___|_|    \_/ \___|_|     \___\___/|_| |_|_| |_|\__, |
//                                                           __/ |
//                                                          |___/
//
// Configuration Options
//
// Usage
//
// Options
//   ServerOwner:             {String}      Optional     //This is only required for first start in order to write to the ServerUsers.txt this must be your steamID64, find ID at - https://steamid.io/
//   ServerName:              {String}      Required     //Default "New Private Server". Quotations required but will not show in server list.
//   ServerPassword:          {String}      Optional     //String server password. Must not contain spaces. Quotations required but will not be included in password.
//   FirstJoinWelcomeMessage: {String}      Optional     //Message displayed to player when player joins the server for the first time.
//   RecurringWelcomeMessage: {String}      Optional     //Message displayed to player when player rejoins the server.
//   ProgressTime:            {true, false} Optional     //Enable day night cycle.
//   DayCycleInMinutes:       {int}          Optional     //Length of a day night cycle in minutes.
//   TimePersistence:         {true, false} Optional     //Continue from time, day and month after server restart. False means the server starts at mid day in spring on server start.
//   StartingWeather:         {0,1,2,3}     Optional     //Default 0. Sunny=0 LightRain=1 HeavyRain=2 Storm=3 LightSnow=4 HeavySnow=5 SnowStorm=6.
//   RandomWeather:           {true, false} Optional     //True by default. Weather switches at random to match season.
//   NameTagDistance:         {0,1,2,3}     Optional     //The distance at which nametags no longer show. 0 = off, 1 = near, 2 medium(default) and 3 = far.
//   ShowLoginMessages:       {true, false} Optional     //Should login messages show when new player enters or leaves the server.
//   ShowDeathMessages:       {true, false} Optional     //Should the server announce when a player dies.
//   PlayerNutrition:         {true, false} Optional     //Does the players nutrition and hydration go down.
//   StaminaDrainRate:        {true, false} Optional     //Does stamina drain.
//   LootSpawnRate:           {0-9}         Optional     //Global loot spawn rate. 0=NoLoot 1=Rare 2=Medium 3=High
//   GrowRate:                {0,1,2,3}     Optional     //Global grow rate. 0=NoGrowing 1=Slow 2=Medium 3=Fast
//   HordeDifficulty:         {0,1,2,3}     Optional     //Horde difficulty. 0=NoHorde 1=Easy 2=Medium 3=Hard
//   ZombieAmount:            {0,1,2,3}     Optional     //The overall density of zombies in the world between 0 and 5. 0 = off
//   PassiveAiAmount:         {0,1,2,3}     Optional     //The overall density of passive AI in the world between 0 and 5. 0 = off
//   VehicleSpawnRate:        {0 - 9}       Optional     //Global spawn rate for vehicles. This number is a multiplier against LootSpawnRate
//   StartingComponentsAmount:{0,1,2,3}     Optional     //The global amount of starting components inside of machines like generators and electricity panels.
//   ForcedSpawnPoint         {0 > max}     Optional     //the spawn point that is chosen by default. Based on the spawnPoints array. Comment or remove if not needed. Alternatively mark as -1 to disable.
//   ServerLoadType           {0>}          Optional     //Determines the amount of sectors loaded when running in the editor. 0 = soft load and likely wants to be on when testing.
//   RestartRate              {int}         Optional     //The amount of hours between server restarts. Note if set to 12 then the servers will restart at 3am and 3pm local time. If set to 24h then server will restart at 3am
//   SoloDifficulty           {int}         Optional     //Presets for game difficulty on solo server. 0=easy, 1= med, 2 hard and 3 = hardcore.
//
// Format
//  string Example: ServerOwner=76561198004636696
//  int    Example: DayCycleInMinutes=45
//
ServerIP="127.0.0.1"
ServerPort=0
ServerOwner=
ServerName="New Private Server"
ServerPassword=
WelcomeMessage="Welcome to the server."
RecurringWelcomeMessage="Welcome to the server."
ProgressTime=true
DayCycleInMinutes=45
TimePersistence=true
StartingWeather=0
RandomWeather=true
NameTagDistance=2
ShowLoginMessages=true
ShowDeathMessages=true
PlayerNutrition=true
StaminaDrainRate=true
LootSpawnRate=3
HordeDifficulty=2
ZombieAmount=2
PassiveAiAmount=2
VehicleSpawnRate=2
StartingComponentsAmount=2
ShowInPublicLobby=true
PvpDisabled=false
PlayerStartingItems=2574
SoloDifficulty=2
ServerUsers_README.txt
The ServerUsers.txt file stores all the players that have ever been on a server. Altering this file directly should not generally be required.
The main reason to edit this file would be to increase a players user group. The number directly after the long Steam ID. When in game players can promote other player to any rank that is lower than their own. To set a rank in-game.
- /setrank userName indexOfRank
Or
- /setrank userName rankName
Example user: 76561198004636696,3,false,false,Jayty
ServerUsers.txt
As the ReadMe indicates the serveruser file contains a list of all players who have entered your server.
- 76561198038502026,2,false,false,JB (SteamID, Rank, - , - , Steam Name)
- 76561198004636696,3,false,false,Jayty
TpPresets_README.txt
The TpPresets.json holds a series of teleportation locations. To edit, add or remove these presets the following commands can be used in game.
- /tppreset add nameOfPreset //This adds a tp location a the place where your player is currently located.
- /tppreset update nameOfPreset //This will edit an existing preset to the location the player is currently located.
- /tppreset remove nameOfPreset //Deletes preset of name.
- /tppreset clear //Clears all tp presets.
- To use preset locations enter the commands.
- /tp me nameOfPreset //Tp's yourself to location.
- /tp userName nameOfPreset //Tp's another player to location.
NOTE: Requires teleportation permissions to edit/use.
TpPresets.json
An example of a TpPreset.json.
{
    "presets": [
        {
            "name": "oldtown",
            "preset": {
                "x": -1394.1190185546875,
                "y": -31.57574462890625,
                "z": -2496.749755859375
            }
        },
        {
            "name": "addersfield",
            "preset": {
                "x": 3287.663330078125,
                "y": -43.600486755371097,
                "z": -894.3609008789063
            }
        },
        {
            "name": "blackrock",
            "preset": {
                "x": 2680.36181640625,
                "y": -56.40800476074219,
                "z": -2946.27197265625
            }
        },
        {
            "name": "sagecreek",
            "preset": {
                "x": 2040.5694580078125,
                "y": 51.473960876464847,
                "z": 1239.3262939453125
            }
        },
        {
            "name": "unionpoint",
            "preset": {
                "x": -939.76123046875,
                "y": 54.973411560058597,
                "z": 813.2296142578125
            }
        },
        {
            "name": "mountbaron",
            "preset": {
                "x": -1528.0,
                "y": 320.0,
                "z": -752.0
            }
        },
    ]
}
UserPermissions_README.txt
The UserPermissions.json file contains the base set of user groups and permissions. The UserPermissions.json can be changed while the server is offline in order to setup ranks and their perms.
By default base user groups such as 'User' (All general users) right through to 'Owner' status is setup. Any user group that has the permission '*' has access to ALL in game commands and this should be used sparingly.
Editing: The most important thing when editing is to ensure that the json architecture is maintained. Otherwise the server will fail to read the file and not run.
Creating / Editing User Ranks and Command Groups
User Ranks
User Ranks are a group of permissions that you assign to the rank. You can then assign that User Rank to a user, granting them all of the permissions defined in that rank.
A User Rank has the following five properties:
- Index - This should be a numeric value (no quotes), and should be in consecutive order.
- Rank - This is the name that you will use to assign the rank to a specific user. Make it something meaningful to the permissions you add to it.
- ChatPrefix - When a user with this rank assigned to them types something in the chat window, this text will be prefixed to each chat message they send.
- PrefixColour - This is the color of the above ChatPrefix text. Valid values for this field are listed below under (Prefix Colors)
- Permissions - This is a list of the various permissions that will be assigned to this user group (and thus, any users assigned this group), see below for a list of all permissions possible.
Command Groups
If you find that you have a common set of permissions that you are assigning your users, you can group those permissions in to what is called a Command Group.
A command group is simply a list of permissions, with a name for that group. An example usage might be something like creating a Command Group named: Supporters. You can then simply assign that Command Group to a user, instead of having to assign all of the individual permissions that you might want them to have.
Command Groups also allow you to do things like assign a user the Mod User Rank, but then specifically assign a user a Command Group with other permissions within it. This would make it so that all of your Moderators who had the Mod User Rank could do those actions, but only the user you assigned the Command Group to, would have those additional permissions.
A Command Group has the following two properties:
- Group Name - This is the name that you will use to assign the rank to a specific user. Make it something meaningful to the permissions you add to it.
- Permissions - This is a list of the various permissions that will be assigned to this user group (and thus, any users assigned this group), see below for a list of all permissions possible.
List of all perms. Note that some may not work as expect or work at all.
- BasicUser,
- DropAllSelf,
- DropAllOthers,
- DeleteAllSelf,
- DeleteAllOthers,
- SpawnAI,
- KillAI,
- SetTime,
- SetMonth,
- SetWeather,
- WeatherOnOff,
- TpToLocation,
- TpToPlayer,
- TpPlayerToMe,
- TpPlayerToPlayer,
- TpPresets,
- GodSelf,
- SuperSprint,
- ServerInfo,
- Give,
- Mute,
- Kick,
- Ban,
- UnBan,
- SetStatsSelf,
- SetStatsOthers,
- KillPlayer,
- SetRank,
- CleanUp,
- Up,
- AlwaysSafeLogOff,
- StuckOthers,
- ChatOff,
- Video,
- Restart
List of colors that you can use for the PrefixColor property
- black
- blue
- darkred
- darkgrey
- cyan
- gray
- green
- grey
- magenta
- purple
- red
- white
- yellow
UserPermissions.json
{

	"SystemRanks":[
    {
	  "Index_DontChange":-2,
      "Name_DontChange":"Console",
      "ChatPrefix":"[Console]",
      "PrefixColour":"white"
    },
	{
	  "Index_DontChange":-1,
      "Name_DontChange":"Whisper",
      "ChatPrefix":"[Whisper]",
      "PrefixColour":"darkgrey"
    }
	],
	"UserRanks":[
    {
      "Index":0,
      "Rank":"User",
      "ChatPrefix":"[User]",
      "PrefixColour":"white",
      "Permissions":["Tell", "Reply", "ServerInfo"]
    },
    {
      "Index":1,
      "Rank":"Mod",
      "ChatPrefix":"[Mod]",
      "PrefixColour":"yellow",
      "Permissions":["Tell", "Reply", "Mute", "UnMute", "Kick", "GodSelf", "SuperSprint", "cmdGroup.TP", "DropAllSelf", "DropAllOthers",  "Up" ,"ServerInfo"]
    },
    {
      "Index":2,
      "Rank":"Admin",
      "ChatPrefix":"[Admin]",
      "PrefixColour":"darkred",
      "Permissions":["*"]
    },
    {
      "Index":3,
      "Rank":"Owner",
      "ChatPrefix":"[Owner]",
      "PrefixColour":"purple",
      "Permissions":["Tell", "Reply", "Mute", "UnMute", "Kick", "SetTime", "Ban", "UnBan", "ServerInfo"]
    }
  ],
  "CommandGroups":[
    {
      "GroupName":"TP",
      "Permissions":["TpToLocation","TpToLocation", "TpToPlayer", "TpPlayerToMe", "TpPlayerToPlayer"]
    },
    {
      "GroupName":"Weather",
      "Permissions":["SetTime", "SetMonth", "SetWeather", "WeatherOnOff"]
    },
    {
      "GroupName":"ExampleGroupNinjaMod",
      "Permissions":["Kick", "Mute", "GodSelf"]
    }
    ]
}